
 One of my favorite parts of making any light box is always the background. Backgrounds bring everything together and make the finished pieces look more cohesive. Although they can be time consuming and a bit more complicated at times (because of the placement of the lights), they are worth it.
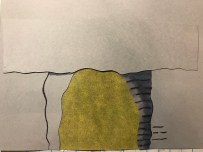
For the prehistoric prompt, I knew I wanted to create a cave scene with cave drawings on the wall and dinosaurs walking outside the cave door. To achieve the look, I decided I would create several layers of grey and black. The layer that was the furthest away would have a smaller surface area that was exposed – that one would also have semi-transparent paper over the back of the opening.
 I began by drawing out the layers and cutting them out. I then started adding details to each one to make them look a bit more interesting. I wasn’t too precise with the details, because I did not want to take an immense amount of time on each layer, and I didn’t feel it mattered too much.
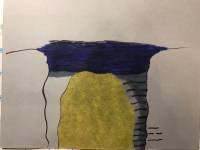
Many times, I’ll make mistakes or decisions I am not happy with, in this case using a blue marker to go over the cave opening. The wonderful thing about paper art, is that you can often times just cover it up with a new layer of paper which is what I did.
 Once I had all my layers done, I then added pieces of foam board to the back of each layer to give each layer a bit more distance from the last. The only layer that did not have foam board was the top one that would be going over the shadow box opening.

 I then created some dinosaur silhouettes and added them to the back, behind the semi-transparent paper.
 I created the floor of the cave by cutting out a piece of black paper and adding some stone like pieces (with colored pencil). It was a very simple and easy design, but in the end it added a lot to the final piece.
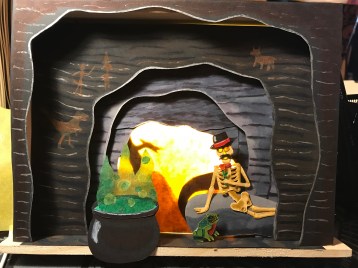
In the end, I added more color to the cave walls, with colored pencil. I also added some cave drawings to one of the top layers, and I made the background layer’s hole bigger (to let in more light). I also decided to change the color of the transparent paper from yellow and purple, to yellow and brown. I ended up deciding to add some mountains and a sun to give it more of an outside setting. I decided to make these changes once I had most of the pieces in the shadow box, with the light on, and I saw how they all looked together. That happens a lot.
There are still lots of changes that need to be made, particularly with the dimension of some of the objects I created.
For future shadow boxes, I need to sketch out everything in the right size, to make sure I achieve the look I’m going for and so that I won’t have to put in as much work editing my pieces.
Do you enjoy the editing process?
Make sure you check back and follow me on Instagram (@WhimsicalStoryBooks) to get sneak peeks, updates, and opportunities to win some of my art.
